HOWTO: Use a C++ Library from Swift
Swift is an exciting new programming language combining the best of older languages such as Java, C++, Objective-C, JavaScript etc. However, huge code bases exist that are written in C and C++. What if you have a library developed in C++ and want to leverage that code in you Swift applications? Here we will see how to incorporate a simple C++ library into a trivial Swift command line utility on Mac OS X. We are going to
- Create a simple command line utility in Swift using Xcode.
- Write a simple C++ library using GCC.
- Write a C++ wrapper to provide the "glue" between our C++ library and the Swift utility.
- Call the wrapper from Swift code.
Create a Swift Command Line Utility in Xcode
First we are going to create a simple command line utility in Swift using Xcode. We could have created a more sophisticated GUI app, but since the focus here is on interfacing Swift with C++ code, a command line utility will suffice.- In Xcode go to File->New->Project, in the dialog that appears select Command Line Tool and click Next.
- Choose a name for your project and type it in the Product Name field in the next dialog; make sure Swift is selected in the Language field. For the purposes of this tutorial let's call it cli_swift. Click Next.
- In the dialog that appears select a location for your project and click Create. The resulting project should consist of one Swift source file, main.swift, which contains:
import Foundation
println("Hello, World!")
We can comment out or remove the "import Foundation" line, since we are not using any of the Foundation features. - Now we can run our project by clicking the Run button from the toolbar, selecting Run from the Product menu, or by typing Command-R. We see "Hello, World!" printed out in the output pane.
Create a C++ Library Using GCC
Now let's build a simple C++ static library. We could have done it in Xcode, but let's just use a command line compiler, GCC. The command for compiling/linking C++ code is g++. You can also use the Clang compiler that should come with your Mac OS X, in which case replace g++ with clang++ in the example.- Choose a location for the library and cd to that directory.
- Create the header file for the library, let's call it junk.h, with the following content:
class A { public: A(int); int getInt(); private: int m_Int; }; - Create the library's implementation file, call it junk.cpp, with the following content:
#include "junk.h" A::A(int _i) : m_Int(_i) {} int A::getInt() { return m_Int; } - Compile junk.cpp to object file, junk.o, and create a library, named libjunkcpp.a, that contains the object file ($ is the command prompt of the Terminal):
$ g++ -c junk.cpp
$ ar r libjunkcpp.a junk.o
Add C++ Wrapper to the Xcode Project to Provide the Swift-C++ Interface
Now that we have our library, let's go back to Xcode and create a C++ file providing the "glue" between our C++ library and command line utility written in Swift. The "glue" has to be in C++ because it will call C++ library code that was not written to be called from C. The "glue" is, however, written in such a way that it can be called from C code, and things that can be called from C can typically be also called from Swift. See the comments in the code below.- Add the static C++ library to the Xcode project. We need this in order to be able to call the library from the C++ wrapper ("glue"). Please see here how to do this.
- Add the library's header file, junk.h, to our project by going to File->Add Files to "cli_swift"..., navigating to the file, and clicking Add.
- Go to File->New->File, select C++ file in the dialog that appears, and click Next.
- Type wrapper.cpp in the Name field, uncheck "Also create a header file," and click Next.
- In the dialog that appears choose a location for the new file and click Create.
- If at this point Xcode suggests that you create a bridging header, click Yes. Otherwise we can create a bridging header manually by going to the "Swift Compiler - Code Generation" section under Build Settings and specifying a header name on the "Objective-C bridging Header" line.
- Modify wrapper.cpp to have the following content:
#include "junk.h"
// extern "C" will cause the C++ compiler
// (remember, this is still C++ code!) to
// compile the function in such a way that
// it can be called from C
// (and Swift).
extern "C" int getIntFromCPP()
{
    // Create an instance of A, defined in
    // the library, and call getInt() on it:
    return A(1234).getInt();
}
Use C++ from Swift Code via the Wrapper
Now we need to tell Swift about the getIntFromCPP() method. Any C functions that we want to call from Swift must be declared in the bridging header, so we add the following to the bridging header:
int getIntFromCPP();
Now we can call the method from Swift by adding the following to main.swift:
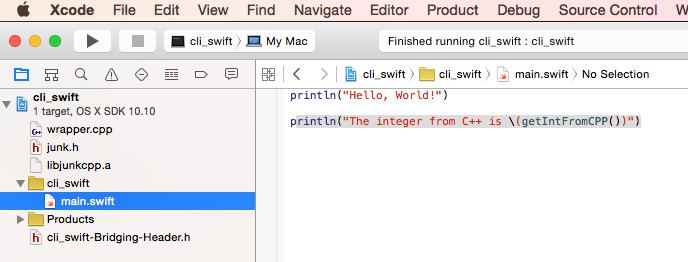
println("The integer from C++ is \(getIntFromCPP())")
Run the project, and the output is:
Hello, World!
The integer from C++ is 1234
That's it! Congratulations! You have just written a Swift app that uses an external static library written in C++. Below is a screenshot of what your Xcode project might look like: